ROS 2 F1/10 Wheeltec Gazebo simulation workshop
The workshop is ROS 2 compatible and
Video
Part 1 of the video series about the workshop is available on YouTube:
Part 2 of the video:
Requirements (high-level)
- ROS 2 Humble: 🟠 see previous workshops or docs.ros.org/en/humble/Installation.html
- Gazebo Fortress: ✅ current workshop gazebosim.org/docs/fortress/install_ubuntu
ROS gz bridge: ✅ current workshop, ROS integration. Install with a single command:sudo apt install ros-humble-ros-gz-bridge, gazebosim.org/docs/fortress/ros2_integration- Build and run custom worlds and models ✅ current workshop (e.g.
F1/10/Wheeltec, Roboworks)
Binary Installation on Ubuntu
Fortress binaries are provided for Ubuntu Bionic, Focal and Jammy. All of the Fortress
binaries are hosted in the osrfoundation repository. To install all of them,
the metapackage ignition-fortress can be installed. The following is based on gazebosim.org/docs/fortress/install_ubuntu.
First install some necessary tools:
sudo apt-get update
sudo apt-get install lsb-release wget gnupg
Then install Ignition Fortress:
sudo wget https://packages.osrfoundation.org/gazebo.gpg -O /usr/share/keyrings/pkgs-osrf-archive-keyring.gpg
echo "deb [arch=$(dpkg --print-architecture) signed-by=/usr/share/keyrings/pkgs-osrf-archive-keyring.gpg] http://packages.osrfoundation.org/gazebo/ubuntu-stable $(lsb_release -cs) main" | sudo tee /etc/apt/sources.list.d/gazebo-stable.list > /dev/null
sudo apt-get update
sudo apt-get install ignition-fortress
All libraries should be ready to use and the ign gazebo app ready to be executed.
Gazebo Fortress ROS 2 integration
Issue the following command:
sudo apt install ros-humble-ros-gz-bridge
sudo apt install ros-$ROS_DISTRO-ros-gz-bridge
Additional settings to WSL2
Warning - WSL2
There is an issue, which can be set even in ~/.bashrc:
export LIBGL_ALWAYS_SOFTWARE=1
Set it in ~/.bashrc:
echo "export LIBGL_ALWAYS_SOFTWARE=1" >> ~/.bashrc
Don't forget to source bashrc.
source ~/.bashrc
After new terminal or source:
echo $LIBGL_ALWAYS_SOFTWARE
should print 1. Alternatively
cat ~/.bashrc | grep LIBGL
Optional: Install rviz-2d-overlay plugin
For better visualization (rviz top left corner yellow text), install the rviz-2d-overlay plugin:
sudo apt install ros-humble-rviz-2d-overlay*
sudo apt install ros-$ROS_DISTRO-rviz-2d-overlay*
Check the installation
Success
Now the ign gazebo should work and the ros2 commands should be available.
Try at least one of the following commands:
ign gazebo
ign gazebo -v 4 -r ackermann_steering.sdf
ign gazebo shapes.sdf
ign param --versions
Packages and build
Detailed description of the packages and build process.
It is assumed that the workspace is ~/ros2_ws/.
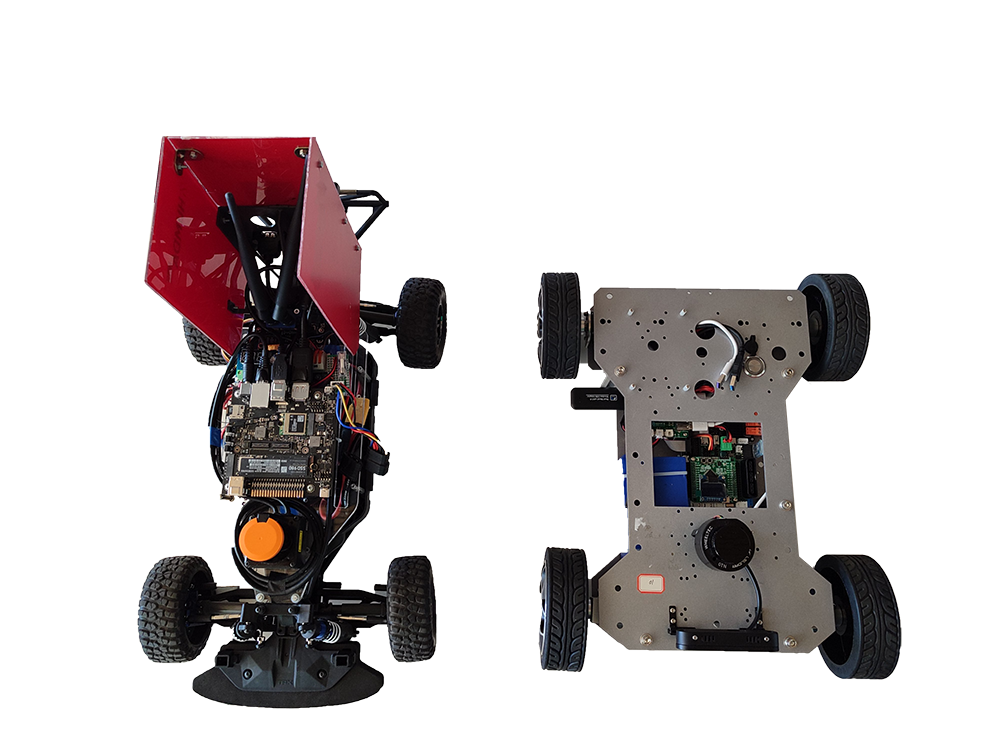
The robotverseny_gazebo24 package contains the Gazebo 2.4 world and model files for the Wheeltec Roboworks robot, while the megoldas_sim24 package contains simple controllers to drive the robot in the simulation.
cd ~/ros2_ws/src
git clone https://github.com/robotverseny/robotverseny_gazebo24
git clone https://github.com/robotverseny/megoldas_sim24
Build
Build the following packages:
robotverseny_applicationrobotverseny_descriptionrobotverseny_bringuprobotverseny_gazebomegoldas_sim24
cd ~/ros2_ws
colcon build --symlink-install --packages-select robotverseny_application robotverseny_description robotverseny_bringup robotverseny_gazebo megoldas_sim24
Run the simulation
Don't forget to source before ROS commands.
source ~/ros2_ws/install/setup.bash
ros2 launch robotverseny_bringup roboworks.launch.py
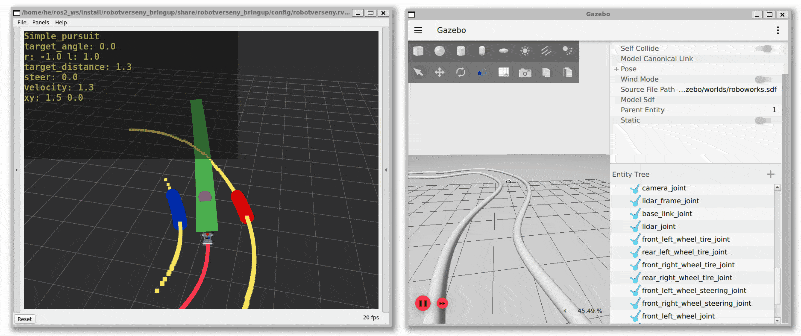
Run the controllers
After starting the simulation, we will need a controller to drive the robot. Two simple controllers are provided: simple_pursuit.py and follow_the_gap.py. An image of the simulation with follow_the_gap controller is shown below.

In a new terminal:
Don't forget to source before ROS commands.
source ~/ros2_ws/install/setup.bash
ros2 launch megoldas_sim24 megoldas1.launch.py # start simple_pursuit
ros2 run megoldas_sim24 simple_pursuit.py
ros2 launch megoldas_sim24 megoldas2.launch.py # start follow_the_gap
ros2 run megoldas_sim24 follow_the_gap.py
The results can be seen in the animation below:
Useful commands
Publish command topic:
ros2 topic pub --once /roboworks/cmd_vel geometry_msgs/msg/Twist "{linear: {x: 2.5, y: 0.0, z: 0.0}, angular: {x: 0.0, y: 0.0, z: -0.01}}"
Teleop twist keyboard:
ros2 run teleop_twist_keyboard teleop_twist_keyboard --ros-args -r /cmd_vel:=/roboworks/cmd_vel
Ignition info topic:
ign topic -i --topic /model/roboworks/cmd_vel
ign topic -et /model/roboworks/cmd_vel
Topics:
ros2 topic list
Here are the topics.
/clicked_point
/clock
/goal_pose
/initialpose
/joint_states
/parameter_events
/robot_description
/roboworks/cmd_vel
/roboworks/odometry
/roboworks/scan
/rosout
/tf
/tf_static
Transformations
The frame /odom_combined is practically the same as /map, there is a static 0,0,0 transform between them. The only dynamic transform is between /odom_combined and /base_link.
graph TD;

    map([ map]):::light
    odom_combined([ odom_combined]):::light
    base_link([ base_link]):::light
    chassis([ chassis]):::light
    camera_link([ camera_link]):::light
    imu_link([ imu_link]):::light
    laser([ laser]):::light

    odom_combined -.->|dynamic| base_link
    base_link -->|static| chassis
    base_link -->|static| camera_link
    base_link -->|static| imu_link
    base_link -->|static| laser
    map ==>|static - same| odom_combined

classDef light fill:#34aec5,stroke:#152742,stroke-width:2px,color:#152742
classDef dark fill:#152742,stroke:#34aec5,stroke-width:2px,color:#34aec5
classDef white fill:#ffffff,stroke:#152742,stroke-width:2px,color:#152742
classDef red fill:#ef4638,stroke:#152742,stroke-width:2px,color:#fff
You can visualize the frames with:
ros2 run rqt_tf_tree rqt_tf_tree
Danger
There might be even more frames, but we are not using them.
Performance troubleshooting
If the simulation is slow, try the following:
Add --cmake-args -DCMAKE_BUILD_TYPE=Release to the build command. And or adjust --parallel-workers N to the number of CPU cores. Example:
colcon build --symlink-install --cmake-args -DCMAKE_BUILD_TYPE=Release --parallel-workers 4 --packages-select robotverseny_application robotverseny_description robotverseny_bringup robotverseny_gazebo megoldas_sim24
As suggested by DDS settings for ROS 2 and Autoware: set the config file path and enlarge the Linux kernel maximum buffer size.
# Increase the maximum receive buffer size for network packets
sudo sysctl -w net.core.rmem_max=2147483647  # 2 GiB, default is 208 KiB

# IP fragmentation settings
sudo sysctl -w net.ipv4.ipfrag_time=3  # in seconds, default is 30 s
sudo sysctl -w net.ipv4.ipfrag_high_thresh=134217728  # 128 MiB
To make it permanent,
sudo nano /etc/sysctl.d/10-cyclone-max.conf
Paste the following into the file:
# Increase the maximum receive buffer size for network packets
net.core.rmem_max=2147483647  # 2 GiB, default is 208 KiB

# IP fragmentation settings
net.ipv4.ipfrag_time=3  # in seconds, default is 30 s
net.ipv4.ipfrag_high_thresh=134217728  # 128 MiB, default is 256 KiB
CTRL+O, ENTER, CTRL+X).
Also have a look at Network settings for ROS 2 and Autoware and Performance Troubleshooting